When the power goes off, the house goes down. Here are some simple, low-cost solutions to keep your internet connection live, your water on, and your electricity running. All three of these systems use a 12 volt, direct current (12VDC) supply such as an ordinary car battery or a generator. If you have a battery-driven lawn mower, you could use its batteries, for example. There is also a small, inexpensive diesel furnace that can keep the heat on when everything else fails. It also runs on 12VDC.
In summary, what you need for all these is:
- Some 12VDC batteries and/or a generator, optional small solar panel(s)
- Internet: maybe a DC-DC converter, a cheap battery charger
- Water: a cheap 12VDC pump, a few plumbing fittings
- Electricity: a generator and/or battery pack/invertor, and maybe a $15 “cheater”.
- Diesel truck cab heater
Note 1: Acronyms are defined at the end of this post: DC, VAC, etc. Some other terms and essential tools are also defined or mentioned there.
Note 2: The following descriptions will probably not be sufficient for some of your circumstances and if so, please use the Comment form at the bottom of this page to ask for help. I’ll do my best.
Keep Your Internet Connection Live
If your connection to your Internet Service Provider (ISP) is good and your ISP is still functioning, this will keep your internet live while the power is out. If you have a home security system, it probably needs internet to provide full protection.
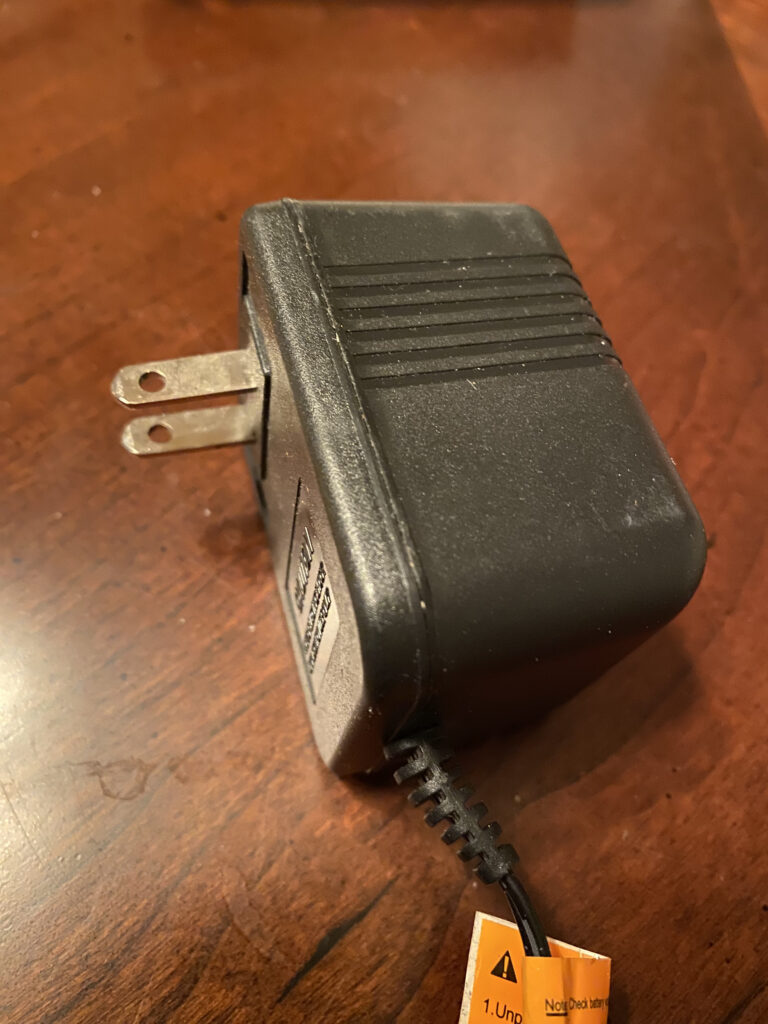
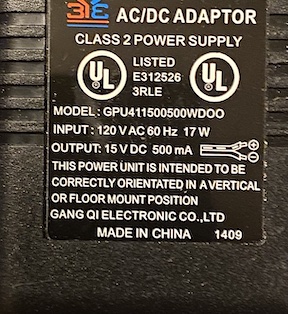
The chances are pretty good that your internet modem and/or wi-fi broadcast devices already run on 12VDC. If they are powered by a “wall-wart” that looks like this one on the left then you can read the specifications on it to see what power the device needs to operate. The AC/DC (AC converting to DC) adaptor pictured here uses 120 VAC for input and puts out 15 VDC with a 500 mA ( 0.5 A) rating (the maximum safely available). So find out what your internet and wi-fi devices need to operate by examining labels on their power supplies (wall warts probably) and/or the specification labels or installation/operation manuals for them.
If they are 12 VDC, then they can be powered directly from a car battery or something similar. (When I buy a new battery, I always keep the old one and add it to the bank of batteries in my basement.)
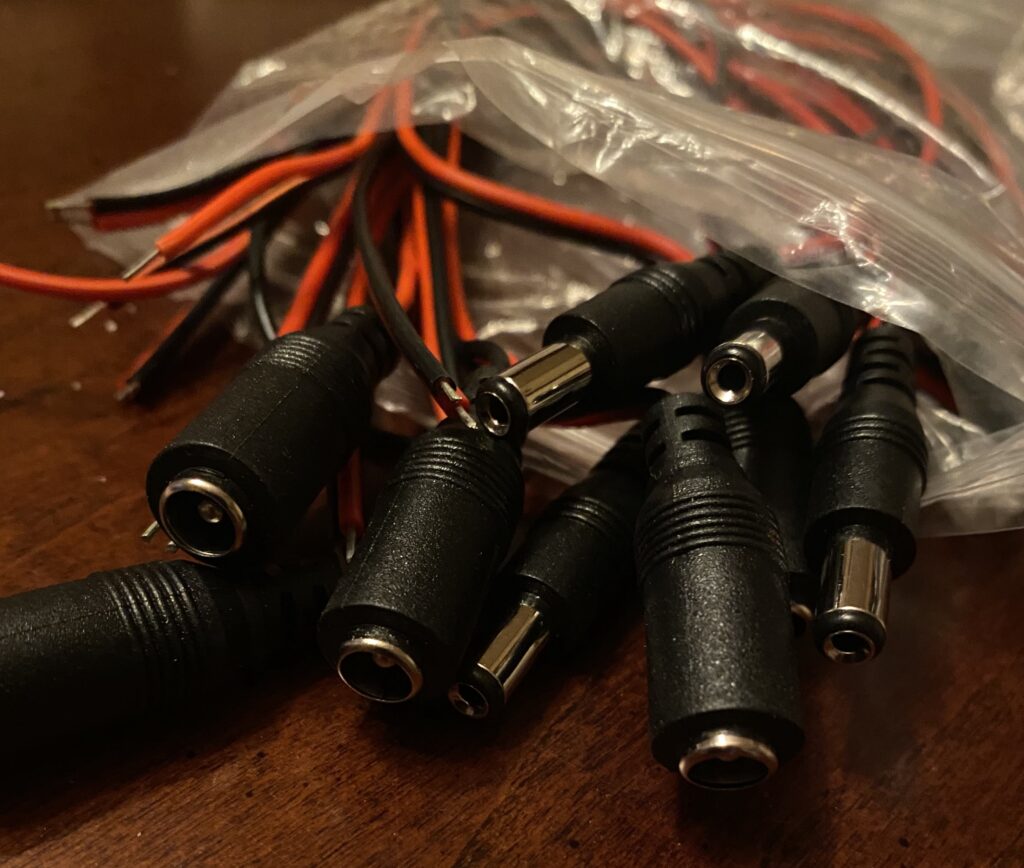
The connections to your internet and wi-fi devices probably look like those pictured here. I have a bunch of these, both male and female, and they are just taking up space, so let me know what you need and I’ll send some. There are different sizes of these even though they look deceptively similar, so that could become an issue.
If a device needs a voltage different from 12VDC, there are inexpensive ways to handle that. I had to buy a DC to DC converter to keep my security system running during power outages because the Ring system wants 5 VDC. For $17 I bought a Drok DC Buck Converter that gave me the needed 5 VDC from my 12VDC source. I was careful to buy a converter that could continuously deliver about twice the wattage I needed. You don’t want electronics running constantly at capacity.
Keep Your Water On
If you build this little system, it will take some of the stress out of emergency situations because you will be using water from your regular faucets – an effective stress reliever. This should cost substantially less than $100 unless you don’t already have some water storage going for you.
I assume here, that you already have some water storage. That should be a given. If you don’t get something – at least a several-gallon food-grade container and fill it. Use already chlorinated city water or add household bleach. Check the bleach label; if it’s 5 to 9% sodium hypochlorite add 2 drops per quart of water.
This system is simply a pump to move your storage water into your household plumbing. This makes for a very convenient emergency water system and saves the time it would otherwise take for dipping or pouring your stored water when you want to use it. It also gives you a good reason to keep your faucets and toilets tuned up so they aren’t dripping. You don’t want to waste your precious storage water. (You will want to disable toilet flushing somehow so you don’t forget when you’re on emergency water rations.)
So you just need whatever fittings are required to connect your emergency water pump to your stored water container and to the cold water supply coming into your house. That connection must be downstream from the main water shutoff valve so you don’t end up pumping water into your neighbor’s houses. When you change over from city water to your own pump, turn off the main house water valve first, then activate your emergency system.
The pump I used in my Cargo Trailer Camper Conversion is Seaflo, series 21, 12VDC, 35 PSI I bought for $27 on Amazon. It shuts off when the pressure reaches 35 PSI but it would deliver low pressure if your pump needs to move water up from your basement. You would want a 45 PSI pump. These pumps have auto-shut-off at the rated pressure.
The plumbing fittings you need are dependent on your particular circumstances, but your hardware guy will be happy to help you sort that out. Take the pump with you when you shop.
You may want to tee into the cold water supply downstream from your main shut-off valve and probably before your water heater (because if it’s a gas-fired heater it might still work without grid power and it certainly will work if you are going to power up the whole house as described below). Actually, you can tap in anywhere (water will go whichever direction you push it) including into a hose bib. For example, you could unscrew the cold side washing machine hose and push water into the house plumbing there. That would bypass your water heater but that may not be an issue for you. I would avoid pushing water into the hot side, your hot water heater may have a check valve that will prevent water from moving backward through it. That’s easy to test though, if the hot water side is a lot easier to access from your pump.
Keep Your Electricity Running
Here I assume you already have a 120 VAC gasoline-powered generator or something similar. Or, you can generate 120 VAC from your 12 VDC car battery (or something similar) using an inverter. The point is, that having your emergency water coming out of your usual faucets is a calming thing, and having power all over the house, and avoiding the mess of extension cords running around, is also a reassuring condition.
It is helpful to use recreational vehicles as an example here. Many of them have both a generator and all have batteries for power sources. In fact, if you already have an RV, you may want to live in it during emergencies or bring its system(s) into use by connecting it to your house.
An ideal system has both batteries and a generator. You run your systems around the clock from the batteries and keep them charged using the generator. This minimizes the amount of time and effort to keep everything connected and working. But it also maximizes the amount of energy you are using from your batteries so you will want to carefully survey the house and turn off unnecessary things. You probably have several “wall warts” on the ready to charge your computers and smart phones and various oddball things like power tooth brushes. If you want to be careful with power consumption you will want to unplug all those because they each draw a little power just because they are plugged in.
Battery Power
If you choose to get your emergency power from batteries, you will need an inverter. The question is what size should you get? The answer is determined by the size of your intended/hoped-for usage. You probably just want to be able to run lights and maybe a few small appliances like a shaver, maybe a CPAP machine, maybe even a hair dryer or toaster.
To determine the size of battery and inverter you need, we add up the wattage of the devices you want to be able to run simultaneously and the length of time you will want to run them. (The 3.1 cubic foot mini-fridge in our camper is 60 watts and we leave it on all night even when we aren’t connected to an outside power source.) Let’s say you come up with 100 watts for 4 minutes for a hair dryer and 300 watts for 4 hours for your lights. We are doing this computation for a single day’s use.
The hair dryer needs 4/60 x 100 = 6.66 watt-hours (the fraction of an hour times the wattage), and the lights need 300 x 4 = 1200 watt-hours. So the total is 1206.66. This number is in watt-hours (we are multiplying watts times hours) and we need to convert the watt-hours to amp-hours. The voltage we are dealing with is 115 VAC (an average of 110 and 120), so to convert the watts to amps we use the formula A = W/V (see the watts formulas at the bottom of this page). So 1206.66/115 = 10.49 amp hours.
Inverters are about 90 to 96% efficient in their conversion work, so we need to compensate for that like this: 10.49/.90 = 11.65 amp hours (assuming worse-case efficiency). So we only need about 12 amp-hours per day. If you have a 100 amp-hour battery, it will realistically handle this load for a bit over a week (100/12 = 8.5 days) before you will need to charge that battery. (And that assumes a 100 amp-hour battery is new enough to perform at its rated capacity.
The size inverter you need for this example is 100 (hair dryer) + 300 (lights) = 400 watts. Nearly all electrical devices lose efficiency as they approach their maximum capacity, so you want to use an inverter rated for 500 watts. If you are going to run a refrigerator it will have a motor-driven compressor and that motor will draw at least double its running wattage for a second as it starts the compressor. So you want to allow for that when you size your inverter. Otherwise, the inverter’s overload protection circuit will shut it off every time the fridge tries to start.
As you have sensed, it is wise to have an inverter with a rated capacity well above what you compute. You certainly do not want to plan on running an inverter continuously at full capacity. Most of them will not even do that, by the way. That’s because the specs are typically optimistic.
Batteries
Nomenclature: technically, a battery is a group of cells. A 1.5 AA “battery” is actually a cell. A 12VDC lead-acid car battery is six 2.1VDC cells. So a “battery” might be a room full of various batteries with various cells in them.
Battery technology has forged ahead during the last few decades so now there is a variety of types. For home emergency power you will probably want deep-cycle batteries because they are designed to tolerate heavy use that draws them way down before being charged again. The most durable of these is the golf-cart, 6VDC battery.
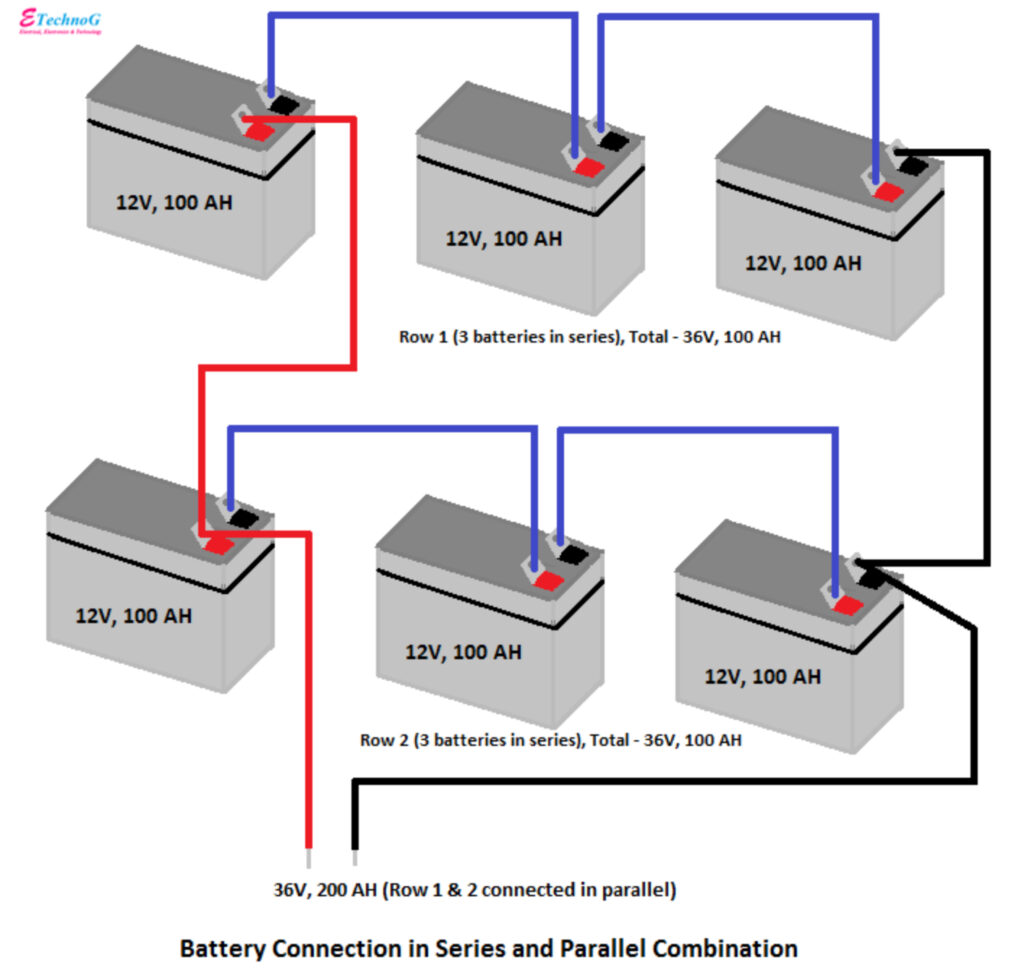
Pictured here is a 6-battery battery showing how batteries may be connected in order to provide the needed voltage. The top row of 12VDC batteries are connected in series (blue lines) so as to produce 36 VDC across the three. The lower three are connected in the same way. Then these two 36VDC batteries are connected in parallel (red lines for the positive side and black for the negative) so as to produce twice as much capacity but still at the 36VDC voltage. In my camper, I use two 6VDC golf cart batteries in series to give me the 12VDC I need. In my basement, I have two old golf cart 6VDC batteries connected in series to give me 12VDC and then an old automobile battery connected in parallel to increase the capacity of my overall battery.
Note that in series, the amp-hour rating of the three remains at 100 amp-hours. However, the two banks in parallel increase the amp-hour rating of all 6 to 200 amp-hours.
Charging Your Batteries
It is important that your battery charger is smart enough to not overcharge the batteries. Battery chargers work by putting a slightly higher voltage than the rated one and thus pushing electrons backward through the battery. (Note that this is not a reverse voltage and that means the charger can always be connected at the same time as any devices that draw power from the battery.) Any quality charger will do for this.
The charger I currently use for my house battery (because I have a power supply at the ready to power my radio station) is a small device called a PWRGate. This is connected to my power supply, my battery, and my house’s 12VDC system (which includes my radio station). The device properly keeps my battery topped up by doing what’s called a “float charge” (tiny trickle of charging current) and when the power supply drops out (grid down or I turn it off or disconnect it for some reason) it instantly switches over to the battery to power the 12VDC system in the house. So the PWRGate keeps my 12VDC devices running constantly and switches its power source automatically and instantly from the grid-powered power supply (which could have been a battery charger) to the battery. Then when the grid comes back online it switches back and charges the battery while the power supply runs my devices. This device is a bit pricey so I only use it when I need instantaneous switching. Like my house system where I could be on the radio in the middle of a transmission. I don’t use it in my cargo conversion camper.
In my camper, I chose a DeWalt battery charger from The Home Depot because I wanted a charger I could easily remove from the camper to start my car when its battery is low. (This charger has a car start function, a battery recondition function, and will test the car’s alternator.) When “boondocking” (camping with no outside power available) I have sometimes depleted all the batteries to the point the tow vehicle would not start so I wanted this car start function as a plan “B” in case my generator was out of fuel or it wouldn’t start either. The only downside I have discovered with this charger is that it is smart enough to shut down if it can’t fully charge the battery in 18 hours. When we have the lights on and the refrigerator running in the camper, the charger is doing its charge thing because it knows the battery is not topped up. If that goes on for 18 hours, it shuts down. A week into using this one, I discovered my battery was low and the charger had quit. So I decided to read the manual. Duh! To fix that problem I put a 1,650 watt, 120VAC timer between the charger and its power outlet. It turns off the charger for about 4 minutes twice a day and that resets the 18 hour countdown.
It is perfectly OK to have your battery constantly connected to whatever load you need to supply power to, and to have your battery charger working at the same time. That will probably raise the DC voltage for your load devices by a volt (13.8VDC is typical for a charger) but that will not be a problem.
Generator Power
A generator is an ideal device because of its flexible usage. You can run extension cords from the generator to appliances, or you can power “half” the house directly and charge your batteries at the same time. You can make your generator back-feed power to your house by purchasing a “generator transfer switch” system to safely do that for a few hundred dollars. Or, you can use a “cheater” for about $15.
The “Cheater”
I do not recommend that you use a cheater because it is dangerous and probably illegal, but it does work and saves a few hundred dollars. A better and safer system is a commercially made “generator transfer switch”, some of which will automatically shut out the grid and start your generator when the grid goes down.
If you search Amazon for “generator lockout kit” you may find a kit for about $40 that adds a small plate inside your breaker panel in your house. It forces the main breaker to be off while the generator back-feed breaker is on, and vice-versa. There are a number of them for various breaker panel manufacturers and models. If these don’t fit properly or are not installed correctly, they will give a false hope of safety so be warned.
You can back-feed half your house from a generator by making a cheater, it’s just a male – male converter. Just cut the female connector off an extension cord and replace it with a male connector that will plug into your generator. My cheater is a foot long so it’s very portable. Be sure you wire it with the green wire to the round ground pin, the white wire to the neutral pin (the wider flat pin), and the black wire to the narrow flat pin.
BEFORE YOU DO ANYTHING ELSE, TURN OFF THE MAIN SWITCH OR BREAKER BETWEEN YOUR POWER METER AND YOUR POWER/BREAKER PANEL. IF YOU DON’T YOU CAN KILL A LINE-MAN. That main switch or breaker may be located at the very top, or sometimes at the very bottom of your panel. Or it may be in a separate box above your panel. An older house may have the main switch in an outside box.
YOU MUST UNDERSTAND that the transformer on the pole (or in a box on the ground) works backward just as well as forward, and if you put 120 VAC from your generator into the grid (by not disconnecting your house from the grid) that transformer will convert your 120VAC to at least 22,000 VAC and send it out on the grid. Needless to say, that can kill the guy who is trying to get your grid power back on.
I highly recommend you have a non-contact voltage detector handy to assure yourself that the panel is dead while you work in it. Even if you think the grid is down, CHECK IT with your detector. We once experienced a “brown out” where one side of the 220VAC circuit coming in from the meter was dead and the other side was still hot. Our power in that location was so often flaky, I bought two tiny amber indicator lights and attached one to each side of the 220 circuit between the meter and my panel so I could tell what was coming through the meter to my panel.
After being certain that your panel is not connected to the grid, turn off all the breakers in your power panel that go to 220VAC appliances like water heaters, kitchen ranges, air conditioners, etc. These are usually double-thick breakers with only one toggle lever. Otherwise, those appliances will be damaged because you are only going to supply one side of the normal 220 VAC system. Now plug the other end of your cheater into an outlet in the garage or house. You will find that about half the 120VAC circuits (lights and outlets primarily) will have power from your generator.
Why “Half the House”?
Breaker panels are fed by 220VAC which is split into two 110VAC branches. Typically, one branch will provide power to every other breaker (like numbers 1, 3, 5, 7, etc) while the other branch powers the other breakers (2, 4, 6, 8, etc). (That’s why breakers for 220VAC devices are double thick – they need to connect to both branches.) So if you want to run your refrigerator(s) you will need to find an outlet for your cheater that is in the same series. This is also when you want to have a non-contact voltage detector (see Tools below) so you can easily tell what breakers are getting power. If your fridge and freezer are on different branches, you probably can leave the black wires attached to their breakers and just pop two out and exchange them. Please use your voltage detector to be sure your panel is dead before doing anything inside it!!
With your main switch/breaker turned off, feed power from your generator to an outlet, search your breakers with your non-contact voltage detector (see Tools below), and determine which circuits are getting power from the back-feed from that outlet.
Your goal is to have some appropriate lighting circuits and refrigeration units on the same 110VAC branch. If it is just too difficult to switch breaker circuits around, you can find an outlet for each branch and take turns between them but that will probably mean running the generator longer.
When to Run Your Generator
Years ago, we had no power at our house for an entire week and found that the following procedure worked well. (I built my cheater on the second day.) Start the generator at dusk when you need lights and let it run until your fridge turns itself off. Run it again 12 hours later until the fridge turns itself off. Schedule any other power uses during those times to minimize generator fuel consumption.
And Keep the Heat On
For my cargo trailer camper conversion, I used a small diesel forced-air furnace the truckers use to heat their mobile sleeping quarters. This Vevor brand unit puts out about 17,000 BTU. A 2,000-square-foot home in Oklahoma would want an 84,000 BTU furnace so this would be adequate for a 400-square-foot home there. These are rough approximations, of course, but you see that this little furnace can make a big difference when you need something to keep the chill off, or worst case, keep the pipes in the basement from freezing when all the utilities are somewhere other than your place for a few days.
The link above is to a Vevor furnace on Amazon that costs about $125. It’s a 5,000-watt heater and includes a tank for the diesel – enough to run 24 to 36 hours depending on the ambient temperature and how you set the thermostat.
These heaters are thermostatically controlled to a point. That point is that they are not able to produce low heat because they have to stay hot enough internally to keep the diesel burning. In our little camper, we often have to use the remote that comes with it to turn it off and then back on again later if needed. The amazing thing about them is the cost/benefit ratio. For less than $200 you can have a 12VDC furnace for emergency heating.
Just like most residential furnaces, these furnaces need outside air for combustion and an exhaust line to the outdoors. You can buy several feet of marine engine exhaust hose to attach to the furnace and then convert to PVC pipe if you need a long run to the outside. For long runs, you will want to use 2 or even 3″ pipe so the fiction won’t impede the flow of air and exhaust.
You can attach ducts or pipes to the cold aid inlet and the hot air outlet so the furnace can go just about anywhere you want the heat. Just don’t get exotic without checking with an engineer who knows what he is doing for pipe sizes at longer lengths.
Other Emergency Ideas
Emergency House Lighting
In the last two houses I have remodeled I have added some 12VDC wiring to power RV-type lights and cigarette lighter sockets in the bathrooms and the LED under-cabinet lights in the kitchen. I added some small solar panels on the porch roof to charge the batteries and ran wires to my amateur radios. Most of these LED light bars run on 12VDC so that’s a natural. I should have put cigarette lighter sockets over the kitchen counters but I forgot to do that and I’m not going back. That system also provided power for the next two ideas.
Wood Heat in the Furnace System
I went a bit more complex on the house that had a wood-burning stove in the basement. Since the basement was unfinished, it was easy to add a thermostatically controlled 12VDC RV ceiling fan (Dometic Fan-Tastic) in the ceiling above the stove that automatically turned on when the air got hot and blew it into the centralized furnace vent system. I put a flapper in the fan exit tube so the furnace could not move air into the fan. I visited the house later and the new owner said his family held a practice grid-down event and that that worked really well to put a little heat into the whole house.
Cheap Refrigeration in the Food Storage Room
In that same house, I heavily insulated a small room in the coldest (northeast) corner of the basement for a “walk-in refrigerator” food storage room. I ran a 6″ diameter tube from the outside east wall into the room at the ceiling and put an ordinary furnace floor vent register in the upper wall on the north side. I put a computer muffin fan in the tube and controlled it with a differentiator circuit that constantly monitored and compared the temperatures in the room and at the outside end of the tube. That circuit turned on the fan whenever the outside temperature was 5 or more degrees cooler than the inside temperature. Finally, I put a thermostat in the fan power circuit to shut off the fan when the temperature in the room fell below 35° F.
Systems Integration
Another idea I like is connecting all the 12VDC systems together. I put a cigarette lighter socket in the outside wall of my house and in the outside wall of our camper trailer. Then by running a cord between them, I had a large battery. If I wanted every battery I owned in that system I could plug the camper into its tow vehicle and the camper into the house. That put all the batteries in the tow vehicle, the camper, and the basement in parallel with each other. When my tow vehicle was a diesel truck that meant two 12VDC batteries in the engine compartment of the truck, two deep-cycle 6 VDC batteries in series in the truck bed (Those were added to let us boondock longer.), two deep-cycle 12VDC batteries in the RV, and 2 old, used car batteries in the house were connected into one high-capacity battery. In an emergency that would give us a pretty good reserve for lighting in the house and/or many hours of radio transmission capacity.
The Best Emergency Prep Guy in the World
If he isn’t actually the very best, he’s gotta be in the top five! Jim Phillips, Spring City, Utah, https://jimsway.com is a personal acquaintance of mine whom I met several years ago in amateur radio emergency preparation classes that he helped teach. I was impressed with his balanced, serious but not affected presentations. He may easily be the world’s best freezing-weather survival trainer. He is publishing an entire emergency prep video system and educational materials on his website. I have a paid membership with Jim because I want access to everything he has and, I just want to help him keep up the great work he is doing. On his website, you can sign up for his monthly emails – they are free and contain links to a lot of his work. Look for “Provident Living Times”.
Jim’s approach to emergency prep is signaled by his byline, “What you know is more important than what you have.” His system is based on four principles: spiritual, attitude, knowledge, and equipment. His primary focus is on the fundamental operators that affect you in emergency situations – understanding them and exactly how they operate gives you the keys to working with them instead of being their victim. He thinks this kind of knowledge takes the fear out of emergencies and I totally agree. It enables the mind to stop imagining how you are going to die and helps it visualize how you are going to live.
Not that he is short on equipment, clothing, etc.
Acronyms, Formulas, and Tools
- A – Amps – a measure of the number of electrons flowing in an electrical circuit
- AC – Alternating Current – what you have running in your house already is 120 VAC
- DC – Direct Current – what comes out of any battery.
- Amper-hours – a measurement of the capacity of a battery to deliver its voltage over a time period. For example, 100 amp-hours means it will deliver 50 amps for 2 hours, or 25 amps for 4 hours (4 x 25 = 100).
- Inverter – A DC to AC convertor, typically converts 12 VDC to 120 VAC.
- GFCI – Ground Fault Circuit Interrupter – a electronic device built into GFCI outlets that shuts off the power if even a small short is detected (like a plugged-in frying pan put under the water tap).
- GFCI Tester – A small 3-pin device to test proper wiring of outlets and test proper GFCI function,
- mA – Milliamps – a measure of current expressed in the number of (amps divided by 1000), or in other words A = 1000 mA. So to convert milliamps to amps, move the decimal point three positions to the left.
- Non-contact voltage detector – a must-have device for working with household circuits.
- PSI – Pounds per square inch – a pressure measurement – maybe 40 PSI in your tires?
- V – Volts – the electrical pressure that pushes current through a circuit
- VAC – Volts of alternating current
- VDC – Volts of direct current
- W – Watts – A measure of power: computed: watts = amps x volts: W = A x V
- Watt-hours – a power measurement consisting of the watts times the hours those watts are used. These are units of energy – sort of like the amount of energy in a gallon of gasoline. Your power bill will be in units of kwa (kilowatt hours) where a kilowatt is 1000 watts.
Note: If you know any two of W, A, and V, you can compute the third one: W = A x V, A = W/V, V = W/A. You may need this when comparing various devices for compatibility or adequacy.